- Quagga를 활용해 Linux에서 OSPF 설정하기2023년 11월 21일 08시 26분 37초에 업로드 된 글입니다.작성자: 채이_E
Quagga 및 Zebra
Quagga 란?
- 일반적인 리눅스에서 라우팅 프로토콜을 설정할 수 있도록 해주는 프로그램
Zebra 란?
- 오픈 소스 TCP/IP 라우팅 소프트웨어
- Static Routing 및 인터페이스를 정의할 때 사용
- 리눅스에서는 기본적으로 네트워크 설정이 되어있기 때문에 Zebra 설정은 건들지 않아도 된다.
Quagga 기본 설정
# yum -y install quagga							// Quagga 설치
// 실행하고자 하는 프로토콜의 파일 가져오기
# cp /usr/share/doc/quagga-0.99.15/zebra.conf.sample /etc/quagga/zebra.conf
# cp /usr/share/doc/quagga-0.99.15/ospfd.conf.sample /etc/quagga/ospfd.conf
// IP forwarding을 수행하기 위해 수정
# vim /etc/sysctl.conf
> net.ipv4.ip_forward = 1
# reboot
// Zebra 실행
# service zebra start
# chkconfig zebra on
# vtysh
예제를 통한 Quagga 학습

R1 설정
R1#conf t
R1(config)#int fa 0/0
R1(config-if)#ip addr 10.10.10.254 255.255.255.0
R1(config-if)#no shu
R1(config-if)#int fa 0/1
R1(config-if)#ip addr 100.100.100.254 255.255.255.0
R1(config-if)#no shu
R1(config-if)#exit
R1(config)#router ospf 1
R1(config-router)#network 10.10.10.0 0.0.0.255 area 1
R1(config-router)#network 100.100.100.0 0.0.0.255 area 1
R2 설정
R2#conf t
R2(config)#int fa 0/0
R2(config-if)#ip addr 20.20.20.254 255.255.255.0
R2(config-if)#no shu
R2(config-if)#int fa 0/1
R2(config-if)#ip addr 200.200.200.254 255.255.255.0
R2(config-if)#no shu
R2(config-if)#exit
R2(config)#router ospf 1
R2(config-router)#network 20.20.20.0 0.0.0.255 area 1
R2(config-router)#network 200.200.200.0 0.0.0.255 area 1
Centos OSPF 설정
# cp /usr/share/doc/quagga-0.99.15/zebra.conf.sample /etc/quagga/zebra.conf
# cp /usr/share/doc/quagga-0.99.15/ospfd.conf.sample /etc/quagga/ospfd.conf
# service zebra start
# service ospfd start
# chkconfig zebra on
# chkconfig ospfd on
# vtysh
localhost.localdomain# show interface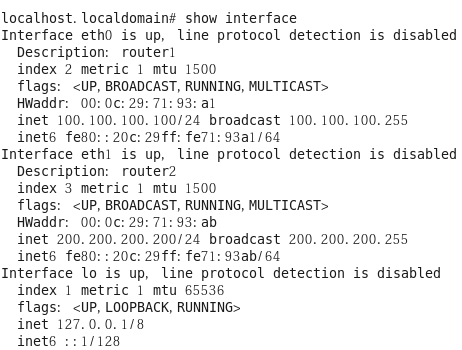
localhost.localdomain(config)# interface eth0
localhost.localdomain(config-if)# ip address 100.100.100.100/24
localhost.localdomain(config-if)# description router1              // 닉네임 설정
localhost.localdomain(config-if)# no shutdown
localhost.localdomain(config-if)# exit
localhost.localdomain(config)# interface eth1
localhost.localdomain(config-if)# ip address 200.200.200.200/24
localhost.localdomain(config-if)# description router2              // 닉네임 설정
localhost.localdomain(config-if)# no shutdown
localhost.localdomain(config-if)# exit
localhost.localdomain(config)# do show interface  description
router1과 router2로 이름 설정 완료 localhost.localdomain(config)# router ospf localhost.localdomain(config-router)# network 100.100.100.0/24 area 1 localhost.localdomain(config-router)# network 200.200.200.0/24 area 1 localhost.localdomain(config-router)# do write // 설정 저장
설정이 저장된 모습 IP Forwarding 수정
# vim /etc/sysctl.conf                  // net.ipv4.ip_forward=1로 수정
# reboot
0에서 1로 수정 GNS3에서 통신 확인

PC 1 -> PC 2 
PC 2 -> PC 1 '네트워크 보안 구축 > 네트워크 경로 설계' 카테고리의 다른 글
네트워크 경로 설계 (0) 2023.11.20 댓글